
20. Project: a complete app
In this project you’ll build a complete app with a window: flashcards for learning anything, from capital cities to times tables. You write cards with a question on one side and the answer on the other, and the app quizzes you.
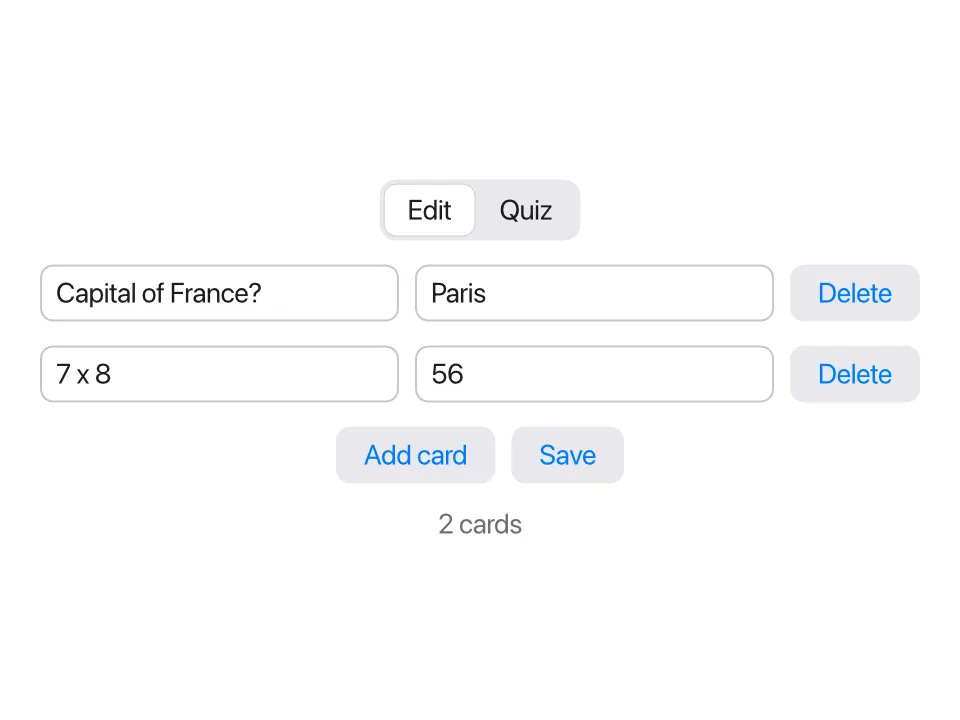
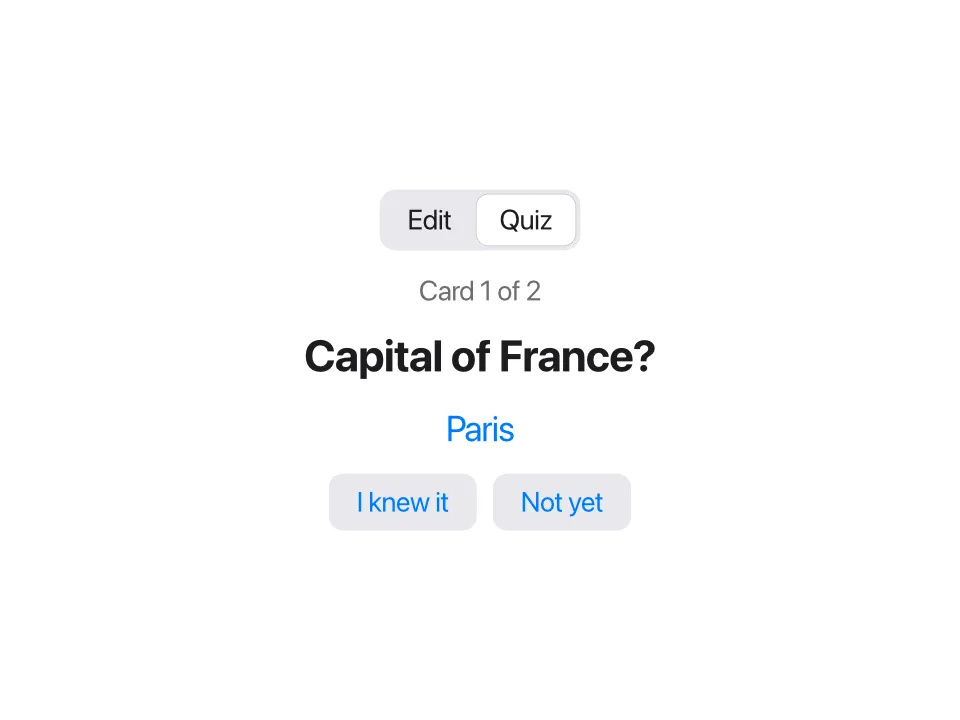
In this lesson you’ll learn:
- how to organize an app into files: model, storage, views and the app
- how to write your own views, and pass them data with
bindparameters so they can change it - how to show a list with
for, and add and delete items - how to load saved data when the app starts, with
.onAppear - how to switch between two modes with an enum and
match - how to check the whole app with a script
It uses almost everything from the course: structs, enums, lists, closures, JSON files, and the app ideas from the last lesson.
The plan
Section titled “The plan”The app has two modes:
- Edit: a list of cards. Each card has a text field for the question and one for the answer, and a Delete button. Below the list: Add card and Save.
- Quiz: one card at a time. First you see the question. Click Show answer to see the answer, then say whether you knew it. At the end, the app tells you your score.
The data is a list of cards, and the cards are saved in a JSON file, like the to-do list in lesson 18.
Like that project, this one is split into files by what they’re about:
flashcards/ model.tsl the Card struct, the Mode enum, small helper functions storage.tsl loading and saving cards views.tsl the views for one card: CardRow and QuizCard main.tsl the app: its state, the window, and what the buttons doMake a folder called flashcards. You’ll add the files one by one.
Step 1: the model
Section titled “Step 1: the model”The model is the data the app works with, without anything about how
it looks. Create model.tsl:
// model.tsl: the data.
struct Card {    id: Int    question: String    answer: String}
// The next free id: one more than the biggest id in use.fn nextCardId(_ cards: [Card]) -> Int {    (cards.map { c in c.id }.max() ?? 0) + 1}
// "1 card", "2 cards": the right word for the number.fn cardCount(_ count: Int) -> String {    if count == 1 { "1 card" } else { "{count} cards" }}
Why does a card need an id? Two cards could have the same question and
answer, so the question can’t tell them apart. The Delete button needs to
say which card to delete, and the window needs to know which row belongs
to which card. A number that’s different for every card solves both.
nextCardId finds the biggest id so far and adds one. (max() is nil
for an empty list, so the first card gets 0 + 1.)
Step 2: a view for one card
Section titled “Step 2: a view for one card”Each card in the list is shown as a row: two text fields and a button. A
row is a good candidate for a view of your own. You declare it with
view, much like a function, and use it just like Text or Button.
Create views.tsl:
// views.tsl: the parts of the window.
// One card in the editor. `bind` lets the fields change the app's card.view CardRow(card: bind Card, onDelete: fn()) {    HStack(spacing: 8) {        TextField("Question", text: card.question)        TextField("Answer", text: card.answer)        Button("Delete") { onDelete() }    }}
Two parameters, and each teaches something:
card: bind Card. A normal parameter is a copy, which the view can read but not change. But typing in the row’s text fields must change the real card in the app’s list. The wordbindmakes the parameter a binding, likeTextField’stext:from the last lesson: the row gets access to the caller’s card itself. Sotext: card.questionbinds the text field to one field of that card.onDelete: fn(). The row can’t delete itself: the list of cards belongs to the app, and the row can’t see it. So the app gives the row a function to call when Delete is clicked, and decides itself what deleting means. You met function parameters in lesson 13.
Step 3: the app, with a list
Section titled “Step 3: the app, with a list”Now create main.tsl, with an app that shows one CardRow per card:
app Flashcards(width: 480, height: 360) {    state cards: [Card] = []
    VStack(spacing: 12) {        for card in cards {            CardRow(card: card) { delete(id: card.id) }                .id(card.id)        }        Button("Add card") { addCard() }        Text(cardCount(cards.count))            .color(.secondary)    }    .padding(20)
    fn addCard() {        cards.append(Card(id: nextCardId(cards), question: "", answer: ""))    }
    fn delete(id: Int) {        cards.removeAll(where: { c in c.id == id })    }}
for card in cardsinside the body makes one row per card. Becausecardsisstate, eachcardin the loop stands for that card in the list, so it can be passed to thebindparameter:CardRow(card: card). No special marker is needed at the call.- The block after
CardRow(card: card)is itsonDeletefunction, written as a trailing block like a button’s action. It calls the app’sdeletewith this card’s id. .id(card.id)tells Tessel which row belongs to which card. Without it, rows are matched by position, and after deleting the first card, the text field you were typing in could end up attached to the wrong row. See Identity with .id.addCardadds an empty card, ready to fill in.deleteremoves the card with that id.
Check it and try it headless. click field 1 clicks the first text field
in the window, and click button 1 the first button, which is the first
row’s Delete button:
tessel check flashcardsTESSEL_SCRIPT='click "Add card"; click "Add card"; click "Add card"; click field 1; type Capital of France?; click field 2; type Paris; tree; click button 1; tree' tessel run flashcardsok: 3 files checked, no errorsRoot View VStack View HStack TextField "Question" = "Capital of France?" TextField "Answer" = "Paris" Button "Delete" View HStack TextField "Question" = "" TextField "Answer" = "" Button "Delete" View HStack TextField "Question" = "" TextField "Answer" = "" Button "Delete" Button "Add card" Text "3 cards"Root View VStack View HStack TextField "Question" = "" TextField "Answer" = "" Button "Delete" View HStack TextField "Question" = "" TextField "Answer" = "" Button "Delete" Button "Add card" Text "2 cards"Each CardRow shows up in the tree as a View with its HStack inside.
Typing went into the first card, and Delete removed exactly that card.
Step 4: saving and loading
Section titled “Step 4: saving and loading”Close the window, and the cards are gone. Add storage.tsl, which works
exactly like in the last two projects:
// storage.tsl: saving and loading cards as JSON.
fn cardsFile() -> String {    joinPath(appDataFolder("Flashcards"), "cards.json")}
fn loadCards() -> [Card] {    let text = readFile(cardsFile()) ?? "[]"    let cards: [Card] = fromJson(text) ?? []    cards}
fn saveCards(_ cards: [Card]) {    writeFile(path: cardsFile(), text: toJson(cards, pretty: true))}
In an app, when do you load? The body can’t do it: it runs again after
every change, and it isn’t allowed to change state. Instead, use the
.onAppear modifier. Its block runs once, when the view first appears,
which for the app’s outermost view is when the app starts. It’s the usual
place to load data.
In main.tsl, add a Save button next to Add card, load the cards in
.onAppear, and save after deleting:
app Flashcards(width: 480, height: 360) {    state cards: [Card] = []
    VStack(spacing: 12) {        for card in cards {            CardRow(card: card) { delete(id: card.id) }                .id(card.id)        }        HStack(spacing: 8) {            Button("Add card") { addCard() }            Button("Save") { saveCards(cards) }        }        Text(cardCount(cards.count))            .color(.secondary)    }    .padding(20)    .onAppear { cards = loadCards() }
    fn addCard() {        cards.append(Card(id: nextCardId(cards), question: "", answer: ""))    }
    fn delete(id: Int) {        cards.removeAll(where: { c in c.id == id })        saveCards(cards)    }}
Test it with two runs. The first adds a card and saves; the second only prints the tree, so everything it shows was loaded from the file:
TESSEL_SCRIPT='click "Add card"; click field 1; type Capital of France?; click field 2; type Paris; click "Save"' tessel run flashcardsTESSEL_SCRIPT='tree' tessel run flashcardsRoot View VStack View HStack TextField "Question" = "Capital of France?" TextField "Answer" = "Paris" Button "Delete" HStack Button "Add card" Button "Save" Text "1 card"Step 5: the quiz
Section titled “Step 5: the quiz”Now the second mode. Two modes, one or the other: that’s an enum. Add it to
model.tsl:
enum Mode { edit, quiz }A Picker at the top of the window chooses the mode, and a match in the
body shows the views for the current one. The quiz needs a little state of
its own: which card it’s on (current), whether the answer is showing, and
how many you knew.
The quiz card is another view. Add it to views.tsl:
// The quiz: one question at a time.view QuizCard(card: Card, showAnswer: Bool) { VStack(spacing: 12) { Text(card.question) .font(size: 22, weight: .bold) if showAnswer { Text(card.answer) .font(size: 18) .color(.blue) } else { Text("?") .font(size: 18) .color(.secondary) } }}This one has no bind: it only shows the card, so a copy is all it
needs. Use bind only when a view has to change the caller’s data.
Here’s the finished main.tsl:
// main.tsl: the app, its state, and what the buttons do.
app Flashcards(width: 480, height: 360) {    state cards: [Card] = []    state mode = Mode.edit    state current = 0    state showAnswer = false    state known = 0
    VStack(spacing: 12) {        Picker(selection: mode) {            Text("Edit").tag(.edit)            Text("Quiz").tag(.quiz)        }
        match mode {            .edit -> {                for card in cards {                    CardRow(card: card) { delete(id: card.id) }                        .id(card.id)                }                HStack(spacing: 8) {                    Button("Add card") { addCard() }                    Button("Save") { saveCards(cards) }                }                Text(cardCount(cards.count))                    .color(.secondary)            }            .quiz -> VStack(spacing: 12) {                if cards.isEmpty {                    Text("Add some cards first.")                } else if current < cards.count {                    Text("Card {current + 1} of {cards.count}")                        .color(.secondary)                    QuizCard(card: cards[current], showAnswer: showAnswer)                    if showAnswer {                        HStack(spacing: 8) {                            Button("I knew it") { next(knewIt: true) }                            Button("Not yet") { next(knewIt: false) }                        }                    } else {                        Button("Show answer") { showAnswer = true }                    }                } else {                    Text("You knew {known} of {cards.count}.")                        .font(size: 22, weight: .bold)                    Button("Start again") { restart() }                }            }            .onAppear { restart() }        }    }    .padding(20)    .onAppear { cards = loadCards() }
    fn addCard() {        cards.append(Card(id: nextCardId(cards), question: "", answer: ""))    }
    fn delete(id: Int) {        cards.removeAll(where: { c in c.id == id })        saveCards(cards)    }
    fn next(knewIt: Bool) {        if knewIt {            known += 1        }        current += 1        showAnswer = false    }
    fn restart() {        current = 0        known = 0        showAnswer = false    }}
How the quiz works:
- The
.quizarm has three situations: no cards at all; a card to ask (current < cards.count); or the end, whencurrenthas gone past the last card. - While a card is asked, Show answer sets
showAnswer. The body runs again,QuizCardnow shows the answer, and the two answer buttons replace the Show answer button. nextcounts the card if you knew it, and moves on. Whencurrentreachescards.count, the body shows the score instead.- The quiz’s
VStackhas its own.onAppear { restart() }. It runs each time you switch to Quiz (thematchstarts showing that view), so every quiz starts from the first card. This is also why the app’s own.onAppearonly runs once: the outer view never goes away. - The
Pickerchangesmodethrough a binding, just like in the tip calculator.
Checking the whole app
Section titled “Checking the whole app”Put the steps of a test session in a file, flashcards.script, one command
per line. It fills in two cards, saves, and takes a quiz, knowing the first
answer but not the second:
click "Add card"click field 1type Capital of France?click field 2type Parisclick "Add card"click field 3type 7 x 8click field 4type 56click "Save"click "Quiz"treeclick "Show answer"treeclick "I knew it"click "Show answer"click "Not yet"treetessel check flashcardsTESSEL_SCRIPT="$(cat flashcards.script)" tessel run flashcardsok: 4 files checked, no errorsRoot View VStack Picker Text "Edit" Text "Quiz" VStack Text "Card 1 of 2" View VStack Text "Capital of France?" Text "?" Button "Show answer"Root View VStack Picker Text "Edit" Text "Quiz" VStack Text "Card 1 of 2" View VStack Text "Capital of France?" Text "Paris" HStack Button "I knew it" Button "Not yet"Root View VStack Picker Text "Edit" Text "Quiz" VStack Text "You knew 1 of 2." Button "Start again"Every step did what it should. Keep this script: whenever you change the
app, run it again and compare. That’s exactly how Tessel tests its own
apps (see Testing your UI). The screenshots at the top of
this page were made the same way, with the snapshot script command.
The saved cards.json, in the app’s folder, holds:
[ { "id": 1, "question": "Capital of France?", "answer": "Paris" }, { "id": 2, "question": "7 x 8", "answer": "56" }]Finally, run it for real with tessel run flashcards, and make some cards
for something you want to learn.
How the pieces fit together
Section titled “How the pieces fit together”Look at how data moves through the app:
- The app owns the data.
cardsand the quiz’s state live inmain.tsl, asstate. Nothing else stores data. - Down, as copies:
QuizCard(card: cards[current], showAnswer: …)only shows the card, so it gets a copy. - Down, as bindings:
CardRow(card: card)edits the card, so it gets a binding, and the text fields inside change the app’s list directly. - Back up, as function calls: the row can’t delete itself, so it calls
the
onDeletefunction the app gave it. - Out to the disk: only
storage.tslknows about files.
That’s the same shape as much bigger apps. Programs and files describes it in more detail.
Common mistakes
Section titled “Common mistakes”Binding to a filtered list
Section titled “Binding to a filtered list”Say you want to hide empty cards in the editor, and loop over a filtered list:
for card in cards.filter({ c in !c.question.isEmpty }) { CardRow(card: card) { delete(id: card.id) }error: `CardRow`'s `card:` changes its value, so it can't be given `card`, which is a loop variable --> flashcards/main.tsl:19:35 |19 | CardRow(card: card) { delete(id: card.id) } | ^^^^ ::: flashcards/main.tsl:18:21 |18 | for card in cards.filter({ c in !c.question.isEmpty }) { | ---- declared here | = help: loop over a `var` or `state` list to be able to change its items (a list made by `filter` or `sorted` is a new copy)filter makes a new list of copies, so a change to one of its items would
go nowhere. Loop over cards itself, and use if inside the loop to skip
the ones you don’t want to show:
for card in cards { if !card.question.isEmpty { CardRow(card: card) { delete(id: card.id) } .id(card.id) }}Changing the app’s list from inside a row
Section titled “Changing the app’s list from inside a row”It’s tempting to delete the
card right in CardRow:
view CardRow(card: bind Card) { HStack(spacing: 8) { TextField("Question", text: card.question) TextField("Answer", text: card.answer) Button("Delete") { cards.removeAll(where: { c in c.id == card.id }) } }}error: cannot find `cards` --> flashcards/views.tsl:8:28 |8 | Button("Delete") { cards.removeAll(where: { c in c.id == card.id }) } | ^^^^^ not found | = help: did you mean `card`?A view only sees its own parameters and state; cards belongs to the app.
That’s why CardRow takes an onDelete function instead.
Running one file
Section titled “Running one file”As with any program in a folder, run the folder
(tessel run flashcards), not main.tsl, or the names from the other files
are missing.
Ideas to extend it
Section titled “Ideas to extend it”1. Shuffle. Asking the cards in the same order every time makes the quiz too easy. Make each quiz use a shuffled copy of the cards.
Solution
Add a state for the quiz’s own list, state quizCards: [Card] = [], and
fill it in restart:
fn restart() { quizCards = cards.shuffled() current = 0 known = 0 showAnswer = false }Then use quizCards instead of cards everywhere in the .quiz arm:
quizCards.isEmpty, current < quizCards.count,
QuizCard(card: quizCards[current], …) and so on. Since restart runs each
time the quiz appears, every quiz has a new order. (To skip empty cards
too: cards.filter { c in !c.question.isEmpty }.shuffled().)
2. Save automatically. The user has to remember to click Save. Save
whenever a card is added, and when switching to the quiz (hint: restart
runs then). Could you remove the Save button?
3. Practice what you missed. At the end of a quiz, offer a button Practice the missed ones, which starts a new quiz with only the cards you answered “Not yet”. You’ll need to remember those cards: a list of ids in a state works well.
4. Several decks. Add a name to a deck (struct Deck { name: String; cards: [Card] }) and let the user switch between decks with a Picker.
Save all decks in one JSON file. Remember that a new field needs a default
value if old files should still load.
5. Your own idea. A notes app, a habit tracker, a recipe book: they’re all “a list of structs, a view for one item, and a JSON file”. You now know how to build every one of them.
Summary
Section titled “Summary”- Organize an app into files: model (the data), storage (files), views (parts of the window) and the app (state and actions).
- Write your own views with
view Name(parameters) { … }, and use them like built-in ones. - A
bindparameter lets a view change its caller’s data; a normal parameter is a read-only copy. Usebindonly when the view edits. - A
forloop over astatelist makes one view per item, and its loop variable can be bound. Give rows an.id(…). - A view that can’t change the list itself takes a function parameter
(
onDelete: fn()), and the caller decides what happens. .onAppear { … }runs when a view appears: load data there.- An enum and
matchswitch between modes of an app. - A script in a file, run with
TESSEL_SCRIPT, checks the whole app in seconds.
Next: 21. Where to go next